Tuesday, March 3, 2015

What are Namespaces?

Namespacing does for functions and classes what scope does for variables. It allows you to use the same function or class name in different parts of the same program without causing a name collision.
In simple terms, think of a namespace as a person's surname. If there are two people named "John" you can use their surnames to tell them apart.

The Scenario

Suppose you write an application that uses a function named output(). Your output() function takes all of the HTML code on your page and sends it to the user.
Later on your application gets bigger and you want to add new features. You add a library that allows you to generate RSS feeds. This library also uses a function named output() to output the final feed.
When you call output(), how does PHP know whether to use your output() function or the RSS library's output() function? It doesn't. Unless you're using namespaces.

Example

How do we solve having two output() functions? Simple. We stick each output() function in its own namespace.
That would look something like this:
namespace MyProject;

function output() {
    # Output HTML page
    echo 'HTML!';
}

namespace RSSLibrary;

function output(){
    # Output RSS feed
    echo 'RSS!';
}
Later when we want to use the different functions, we'd use:
\MyProject\output();
\RSSLibrary\output();
Or we can declare that we're in one of the namespaces and then we can just call that namespace's output():
namespace MyProject;

output(); # Output HTML page
\RSSLibrary\output();

No Namespaces?

If we didn't have namespaces we'd have to (potentially) change a lot of code any time we added a library, or come up with tedious prefixes to make our function names unique. With namespaces, we can avoid the headache of naming collisions when mixing third-party code with our own projects.

Sunday, March 1, 2015

How to Upload Files with CodeIgniter and AJAX?

Uploading files asynchronously with CodeIgniter can be confusing and frustrating experience. In this tutorial I will share the steps how I successfully implemented a file upload with CodeIgniter and ajax.

You need CodeIgniter, jQuery, and the script AjaxFileUpload which you can copy from bottom of this tutorial. 

It's assumed you have a working knowledge of CodeIgniter and jQuery. But no prior knowledge of AjaxFileUpload is necessary. It is also assumed that you already have successfully set up CodeIgniter. For the sake of brevity and clarity, we are not going to use database to save file information.

Step 1. Creating a form
Create your view and name it upload.php. This view will contain our upload form.

<!doctype html>
<html>
<head>
 <script src="https://ajax.googleapis.com/ajax/libs/jquery/1.6.2/jquery.min.js"></script>
 <script src="<?php echo base_url()?>js/custom.js"></script>
 <script src="<?php echo base_url()?>js/ajaxfileupload.js"></script>
</head>
<body>
 <h1>Upload File</h1>
 <form method="post" action="" id="upload_file">
 <label for="userfile">File</label>

 <input type="file" name="userfile" id="userfile" size="20" />
 <input type="submit" name="submit" id="submit" />
 </form>
 <h2>Files</h2>
 <div id="files"></div>
</body>
</html>
At the top; jQuery, AjaxFileUpload, and our own custom javascript files are loaded. 
Then, we created a standard HTML form. The empty #files div is where the confirmation/failure message will be displayed.
Step 2. Custom Javascript
Create custom.js inside 'js' folder and Place the following code:
$(function() {
    $('#upload_file').submit(function(e) {
        e.preventDefault();
        $.ajaxFileUpload({
            url             :base_url + './upload/upload_file/', 
            secureuri       :false,
            fileElementId   :'userfile',
            dataType: 'JSON',
            success : function (data)
            {
               var obj = jQuery.parseJSON(data);                
                if(obj['status'] == 'success')
                {
                    $('#files').html(obj['msg']);
                 }
                else
                 {
                    $('#files').html('Some failure message');
                  }
            }
        });
        return false;
    });
});
The JavaScript hijacks the form submit and AjaxFileUpload takes over. In the background, it creates an iframe and submits the data via that.
We then check our return (which will be in JSON). Depending on the status(success/error), we display message.
Step 3. Uploading a File
The Controller
The URL we are uploading to is /upload/upload_file/, so create a new method in the upload controller, and place the following code in it.
public function upload_file()
{
  $status = "";
  $msg = "";
  $file_element_name = 'userfile';

 if ($status != "error")
{
  $config['upload_path'] = './uploads/';
  $config['allowed_types'] = 'gif|jpg|png|doc|txt';
  $config['max_size'] = 1024 * 8;
  $config['encrypt_name'] = FALSE;

  $this->load->library('upload', $config);
  if (!$this->upload->do_upload($file_element_name))
  {
    $status = 'error';
    $msg = $this->upload->display_errors('', '');
  }
  else
   {
   $data = $this->upload->data();
   $image_path = $data['full_path'];
   if(file_exists($image_path))
   {
      $status = "success";
      $msg = "File successfully uploaded";
 }
 else
 {
  $status = "error";
  $msg = "Something went wrong when saving the file, please try again.";
 }
}
 @unlink($_FILES[$file_element_name]);
 }
 echo json_encode(array('status' => $status, 'msg' => $msg));
}

This code loads in the CodeIgniter upload library with a custom config. Remember to delete the temp file off the server, and echo out the JSON so we know what happened.

Files Folder
We should also create the folder our files will be uploaded to. Create new file in your web root called 'uploads', making sure it is writable by the server.

That's it, tutorial complete! If you run it, you should be able to upload a file, see it appear, all without leaving the page. 

Note: I haven't added displaying, editing and deleting files. 

Goodies:
Copy and paste the following javascript code and save as ajaxfileupload.js.

jQuery.extend({ 

  createUploadIframe: function(id, uri)
 {
   //create frame
      var frameId = 'jUploadFrame' + id;
      var iframeHtml = '<iframe id="' + frameId + '" name="' + frameId + '" style="position:absolute; top:-9999px; left:-9999px"';
   if(window.ActiveXObject)
   {
        if(typeof uri== 'boolean'){
iframeHtml += ' src="' + 'javascript:false' + '"';

        }
        else if(typeof uri== 'string'){
iframeHtml += ' src="' + uri + '"';

        } 
   }
   iframeHtml += ' />';
   jQuery(iframeHtml).appendTo(document.body);

      return jQuery('#' + frameId).get(0);   
  },
  createUploadForm: function(id, fileElementId, data)
 {
  //create form 
  var formId = 'jUploadForm' + id;
  var fileId = 'jUploadFile' + id;
  var form = jQuery('<form action="" method="POST" name="' + formId + '" id="' + formId + '" enctype="multipart/form-data"></form>'); 
  if(data)
  {
   for(var i in data)
   {
    jQuery('<input type="hidden" name="' + i + '" value="' + data[i] + '" />').appendTo(form);
   }   
  }  
  var oldElement = jQuery('#' + fileElementId);
  var newElement = jQuery(oldElement).clone();
  jQuery(oldElement).attr('id', fileId);
  jQuery(oldElement).before(newElement);
  jQuery(oldElement).appendTo(form);
  
  //set attributes
  jQuery(form).css('position', 'absolute');
  jQuery(form).css('top', '-1200px');
  jQuery(form).css('left', '-1200px');
  jQuery(form).appendTo('body');  
  return form;
  },

  ajaxFileUpload: function(s) {
    // TODO introduce global settings, allowing the client to modify them for all requests, not only timeout  
    s = jQuery.extend({}, jQuery.ajaxSettings, s);
    var id = new Date().getTime()    
  var form = jQuery.createUploadForm(id, s.fileElementId, (typeof(s.data)=='undefined'?false:s.data));
  var io = jQuery.createUploadIframe(id, s.secureuri);
  var frameId = 'jUploadFrame' + id;
  var formId = 'jUploadForm' + id;  
    // Watch for a new set of requests
    if ( s.global && ! jQuery.active++ )
  {
   jQuery.event.trigger( "ajaxStart" );
  }      
    var requestDone = false;
    // Create the request object
    var xml = {} 
    if ( s.global )
      jQuery.event.trigger("ajaxSend", [xml, s]);
    // Wait for a response to come back
    var uploadCallback = function(isTimeout)
  {   
   var io = document.getElementById(frameId);
      try
   {    
    if(io.contentWindow)
    {
 xml.responseText = io.contentWindow.document.body?io.contentWindow.document.body.innerHTML:null;
          xml.responseXML = io.contentWindow.document.XMLDocument?io.contentWindow.document.XMLDocument:io.contentWindow.document;

    }else if(io.contentDocument)
    {
 xml.responseText = io.contentDocument.document.body?io.contentDocument.document.body.innerHTML:null;
         xml.responseXML = io.contentDocument.document.XMLDocument?io.contentDocument.document.XMLDocument:io.contentDocument.document;
    } 
      }catch(e)
   {
    jQuery.handleError(s, xml, null, e);
   }
      if ( xml || isTimeout == "timeout")
   {    
        requestDone = true;
        var status;
        try {
          status = isTimeout != "timeout" ? "success" : "error";
          // Make sure that the request was successful or notmodified
          if ( status != "error" )
{
            // process the data (runs the xml through httpData regardless of callback)
            var data = jQuery.uploadHttpData( xml, s.dataType );  
            // If a local callback was specified, fire it and pass it the data
            if ( s.success )
              s.success( data, status );
 
            // Fire the global callback
            if( s.global )
              jQuery.event.trigger( "ajaxSuccess", [xml, s] );
          } else
            jQuery.handleError(s, xml, status);
        } catch(e)
    {
          status = "error";
          jQuery.handleError(s, xml, status, e);
        }

        // The request was completed
        if( s.global )
          jQuery.event.trigger( "ajaxComplete", [xml, s] );

        // Handle the global AJAX counter
        if ( s.global && ! --jQuery.active )
          jQuery.event.trigger( "ajaxStop" );

        // Process result
        if ( s.complete )
          s.complete(xml, status);

        jQuery(io).unbind()

        setTimeout(function()
    { try
     {
      jQuery(io).remove();
      jQuery(form).remove(); 
      
     } catch(e)
     {
      jQuery.handleError(s, xml, null, e);
     }    

    }, 100)

        xml = null

      }
    }
    // Timeout checker
    if ( s.timeout > 0 )
  {
      setTimeout(function(){
        // Check to see if the request is still happening
        if( !requestDone ) uploadCallback( "timeout" );
      }, s.timeout);
    }
    try
  {

   var form = jQuery('#' + formId);
   jQuery(form).attr('action', s.url);
   jQuery(form).attr('method', 'POST');
   jQuery(form).attr('target', frameId);
      if(form.encoding)
   {
    jQuery(form).attr('encoding', 'multipart/form-data');      
      }
      else
   { 
    jQuery(form).attr('enctype', 'multipart/form-data');   
      }   
      jQuery(form).submit();

    } catch(e)
  {   
      jQuery.handleError(s, xml, null, e);
    }
  
  jQuery('#' + frameId).load(uploadCallback );
    return {abort: function () {}}; 

  },

  uploadHttpData: function( r, type ) {
    var data = !type;
    data = type == "xml" || data ? r.responseXML : r.responseText;
    // If the type is "script", eval it in global context
    if ( type == "script" )
      jQuery.globalEval( data );
    // Get the JavaScript object, if JSON is used.
    if ( type == "json" )
      eval( "data = " + data );
    // evaluate scripts within html
    if ( type == "html" )
      jQuery("<div>").html(data).evalScripts();

    return data;
  }
})


If you are looking for delete and display features, you can find in below tutorial.

Reference site: http://code.tutsplus.com/tutorials/how-to-upload-files-with-codeigniter-and-ajax--net-21684 

Monday, February 23, 2015

Role Based Access Control in PHP

There are several different approaches when it comes to managing user permissions, and each have their own positives and negatives. For example, using bit masking is extremely efficient but also limits you to 32 or 64 permissions (the number of bits in a 32- or 64-bit integer). Another approach is to use an access control list (ACL), however you can only assign permissions to objects rather than to specific or meaningful operations.
In this article I will discuss my personal favorite approach: role based access control (RBAC). RBAC is a model in which roles are created for various job functions, and permissions to perform certain operations are then tied to roles. A user can be assigned one or multiple roles which restricts their system access to the permissions for which they have been authorized.
The downside to using RBAC is that if not properly managed, your roles and permissions can easily become a chaotic mess. In a rapidly changing business environment, it can be a job in itself to keep track of assigning appropriate roles to new employees and removing them in a timely manner from former employees or those switching positions. Additionally, identifying new roles for unique job duties and revising or removing requires regular review. Failure to properly manage your roles can open the door to many security risks.
I will begin by discussing the necessary database tables, then I’ll create two class files: (Role.php) which will perform a few tasks specific to roles, and (PrivilegedUser.php) that will extend your existing user class. Finally I’ll walk through some examples of how you might integrate the code into your application. Role management and user management go hand in hand, and so in this article I’ll assume that you already have some type of user authentication system in place.
Database
You need four tables to store role and permission information: the roles table stores a role ID and role name, the permissions table stores a permission ID and description, the role_perm table associates which permissions belong to which roles, and the user_role table associates which roles are assigned to which users.
Using this schema, you can have an unlimited number of roles and permissions and each user can be assigned multiple roles.
These are the CREATE TABLE statements for the database:
1
2
3
4
5
6
7
8
9
10
11
12
13
14
15
16
17
18
19
20
21
22
23
24
25
26
27
28
29
CREATE TABLE roles (
  role_id INTEGER UNSIGNED NOT NULL AUTO_INCREMENT,
  role_name VARCHAR(50) NOT NULL,

  PRIMARY KEY (role_id)
);

CREATE TABLE permissions (
  perm_id INTEGER UNSIGNED NOT NULL AUTO_INCREMENT,
  perm_desc VARCHAR(50) NOT NULL,

  PRIMARY KEY (perm_id)
);

CREATE TABLE role_perm (
  role_id INTEGER UNSIGNED NOT NULL,
  perm_id INTEGER UNSIGNED NOT NULL,

  FOREIGN KEY (role_id) REFERENCES roles(role_id),
  FOREIGN KEY (perm_id) REFERENCES permissions(perm_id)
);

CREATE TABLE user_role (
  user_id INTEGER UNSIGNED NOT NULL,
  role_id INTEGER UNSIGNED NOT NULL,

  FOREIGN KEY (user_id) REFERENCES users(user_id),
  FOREIGN KEY (role_id) REFERENCES roles(role_id)
);
Note the final table, user_role, references a users table which I have not defined here. This assumes that user_id is the primary key of your users table.
You don’t need to make any modifications to your users table to store role information as that information is stored separately in these new tables. Contrary to some other RBAC systems, a user here is not required to have a role by default; instead, the user simply won’t have any privileges until a role has been specifically assigned. Alternatively, it would be possible in the PrivilegedUser class to detect an empty role and respond with a default unprivileged role when required, or you could opt to write a short SQL script to copy over user IDs and initialize them by assigning a default unprivileged role.
Role Class
The primary focus of the Role class is to return a role object that is populated with each roles corresponding permissions. This will allow you to easily check whether a permission is available without having to perform redundant SQL queries with every request.
Use the following code to create Role.php:
1
2
3
4
5
6
7
8
9
10
11
12
13
14
15
16
17
18
19
20
21
22
23
24
25
26
27
28
29
<?php
class Role
{
    protected $permissions;

    protected function __construct() {
        $this->permissions = array();
    }

    // return a role object with associated permissions
    public static function getRolePerms($role_id) {
        $role = new Role();
        $sql = "SELECT t2.perm_desc FROM role_perm as t1
                JOIN permissions as t2 ON t1.perm_id = t2.perm_id
                WHERE t1.role_id = :role_id";
        $sth = $GLOBALS["DB"]->prepare($sql);
        $sth->execute(array(":role_id" => $role_id));

        while($row = $sth->fetch(PDO::FETCH_ASSOC)) {
            $role->permissions[$row["perm_desc"]] = true;
        }
        return $role;
    }

    // check if a permission is set
    public function hasPerm($permission) {
        return isset($this->permissions[$permission]);
    }
}
The getRolePerms() method creates a new Role object based on a specific role ID, and then uses aJOIN clause to combine the role_perm and perm_desc tables. For each permission associated with the given role, the description is stored as the key and its value is set to true. The hasPerm() method accepts a permission description and returns the value based on the current object.
Privileged User Class
By creating a new class that extends your existing user class, you can reuse your existing code logic for managing users and then add some additional methods on top of those which are geared specifically towards working with privileges.
Use the following code to create the file PrivilegedUser.php:
1
2
3
4
5
6
7
8
9
10
11
12
13
14
15
16
17
18
19
20
21
22
23
24
25
26
27
28
29
30
31
32
33
34
35
36
37
38
39
40
41
42
43
44
45
46
47
48
49
50
51
52
53
<?php
class PrivilegedUser extends User
{
    private $roles;

    public function __construct() {
        parent::__construct();
    }

    // override User method
    public static function getByUsername($username) {
        $sql = "SELECT * FROM users WHERE username = :username";
        $sth = $GLOBALS["DB"]->prepare($sql);
        $sth->execute(array(":username" => $username));
        $result = $sth->fetchAll();

        if (!empty($result)) {
            $privUser = new PrivilegedUser();
            $privUser->user_id = $result[0]["user_id"];
            $privUser->username = $username;
            $privUser->password = $result[0]["password"];
            $privUser->email_addr = $result[0]["email_addr"];
            $privUser->initRoles();
            return $privUser;
        } else {
            return false;
        }
    }

    // populate roles with their associated permissions
    protected function initRoles() {
        $this->roles = array();
        $sql = "SELECT t1.role_id, t2.role_name FROM user_role as t1
                JOIN roles as t2 ON t1.role_id = t2.role_id
                WHERE t1.user_id = :user_id";
        $sth = $GLOBALS["DB"]->prepare($sql);
        $sth->execute(array(":user_id" => $this->user_id));

        while($row = $sth->fetch(PDO::FETCH_ASSOC)) {
            $this->roles[$row["role_name"]] = Role::getRolePerms($row["role_id"]);
        }
    }

    // check if user has a specific privilege
    public function hasPrivilege($perm) {
        foreach ($this->roles as $role) {
            if ($role->hasPerm($perm)) {
                return true;
            }
        }
        return false;
    }
}
The first method, getByUsername(), returns an object populated with information about a specific user. A method almost identical to this will likely already exist in your user class, but you need to override it here so that the PrivilegedUser‘s methods can be called with the appropriate object. If you try to invoke aPrivilegedUser method on a User object, you will get an error stating that the method doesn’t exist.
The second method, initRoles(), uses a JOIN to combine the user_role and roles tables to collect the roles associated with the current user’s ID. Each role is then populated with its corresponding permissions with a call to the Role class method previously created, Role::getRolePerms().
The final method, hasPrivilege(), accepts a permission description and returns true of the user has the permission or false otherwise.
With the preceding two classes in place, checking if a user has a specific privilege is as simple as follows:
1
2
3
4
5
6
7
8
9
10
11
12
13
14
15
16
<?php
require_once "Role.php";
require_once "PrivilegedUser.php";

// connect to database...
// ...

session_start();

if (isset($_SESSION["loggedin"])) {
    $u = PrivilegedUser::getByUsername($_SESSION["loggedin"]);
}

if ($u->hasPrivilege("thisPermission")) {
    // do something
}
Here the username is stored in the active session and a new PrivilegedUser object is created for that user on which the hasPrivilege() method can be called. Depending on the information in your database, your object output will look similar to the following:
object(PrivilegedUser)#3 (2) {
  ["roles":"PrivilegedUser":private]=>
  array(1) {
    ["Admin"]=>
    object(Role)#5 (1) {
      ["permissions":protected]=>
      array(4) {
        ["addUser"]=>bool(true)
        ["editUser"]=>bool(true)
        ["deleteUser"]=>bool(true)
        ["editRoles"]=>bool(true)
      }
    }
  }
  ["fields":"User":private]=>
  array(4) {
    ["user_id"]=>string(1) "2"
    ["username"]=>string(7) "mpsinas"
    ["password"]=>bool(false)
    ["email_addr"]=>string(0) ""
  }
}
Keeping Things Organized
One of the many benefits of using an OOP approach with RBAC is that it allows you to separate code logic and validation from object specific tasks. For example, you could add the following methods to your Roleclass to help manage role specific operations such as inserting new roles, deleting roles and so on:
1
2
3
4
5
6
7
8
9
10
11
12
13
14
15
16
17
18
19
20
21
22
23
24
25
26
27
28
29
30
31
32
33
34
35
36
37
38
39
// insert a new role
public static function insertRole($role_name) {
    $sql = "INSERT INTO roles (role_name) VALUES (:role_name)";
    $sth = $GLOBALS["DB"]->prepare($sql);
    return $sth->execute(array(":role_name" => $role_name));
}

// insert array of roles for specified user id
public static function insertUserRoles($user_id, $roles) {
    $sql = "INSERT INTO user_role (user_id, role_id) VALUES (:user_id, :role_id)";
    $sth = $GLOBALS["DB"]->prepare($sql);
    $sth->bindParam(":user_id", $user_id, PDO::PARAM_STR);
    $sth->bindParam(":role_id", $role_id, PDO::PARAM_INT);
    foreach ($roles as $role_id) {
        $sth->execute();
    }
    return true;
}

// delete array of roles, and all associations
public static function deleteRoles($roles) {
    $sql = "DELETE t1, t2, t3 FROM roles as t1
            JOIN user_role as t2 on t1.role_id = t2.role_id
            JOIN role_perm as t3 on t1.role_id = t3.role_id
            WHERE t1.role_id = :role_id";
    $sth = $GLOBALS["DB"]->prepare($sql);
    $sth->bindParam(":role_id", $role_id, PDO::PARAM_INT);
    foreach ($roles as $role_id) {
        $sth->execute();
    }
    return true;
}

// delete ALL roles for specified user id
public static function deleteUserRoles($user_id) {
    $sql = "DELETE FROM user_role WHERE user_id = :user_id";
    $sth = $GLOBALS["DB"]->prepare($sql);
    return $sth->execute(array(":user_id" => $user_id));
}
Likewise, you could add onto your PrivilegedUser class with similar methods:
1
2
3
4
5
6
7
8
9
10
11
12
13
14
15
16
17
18
// check if a user has a specific role
public function hasRole($role_name) {
    return isset($this->roles[$role_name]);
}

// insert a new role permission association
public static function insertPerm($role_id, $perm_id) {
    $sql = "INSERT INTO role_perm (role_id, perm_id) VALUES (:role_id, :perm_id)";
    $sth = $GLOBALS["DB"]->prepare($sql);
    return $sth->execute(array(":role_id" => $role_id, ":perm_id" => $perm_id));
}

// delete ALL role permissions
public static function deletePerms() {
    $sql = "TRUNCATE role_perm";
    $sth = $GLOBALS["DB"]->prepare($sql);
    return $sth->execute();
}
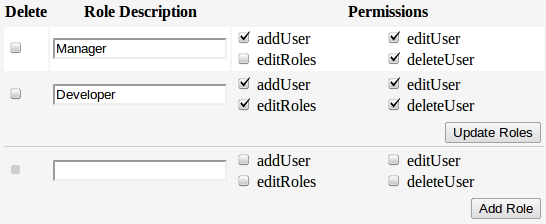
Because permissions are tied directly to the application’s underlying code logic, new permissions should be manually inserted into or deleted from the database as required. Roles on the other hand can be easily created, modified or deleted via an administration interface.

The more roles and permissions you have the more difficult things will be to manage; keeping the lists minimal is important, but sometimes the contrary is unavoidable. I can only advise that you use your best judgement and try not to get carried away.

How to change the PHP version for subfolders or subdomains

  How to change the PHP version for subfolders or subdomains Setting a specific PHP version for a specific websites, subfolders or subdomain...