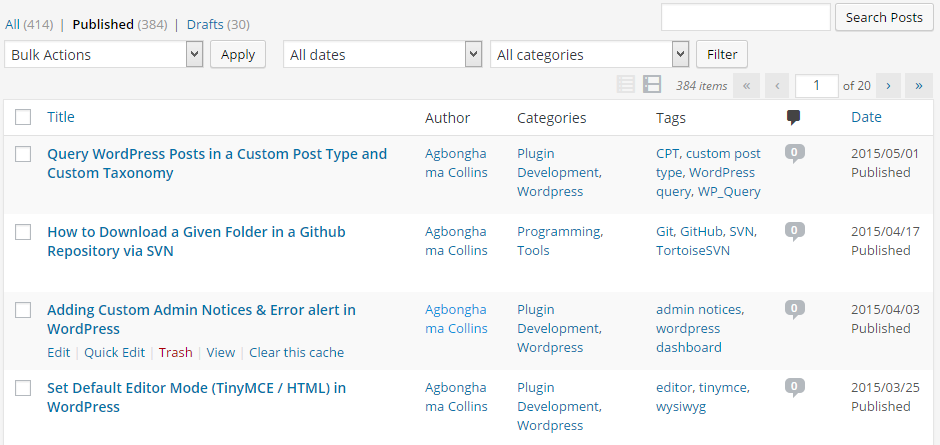
In the WordPress dashboard, the tables that displays the posts, pages and user data are all created internally by WordPress using the
WP_List_Table PHP class.
Below are a couple of screenshots of the post and user admin pages:
As a plugin developer, the need to build a custom table that will contain a given data might arise. Rather than code your own table design, it’s best you use that of WordPress in order for your plugin settings page to conform to WordPress UI.
While you might be tempted to copy the HTML and CSS table design by viewing the source code of WordPress, you shouldn’t because the WP_List_Table class is there to help.
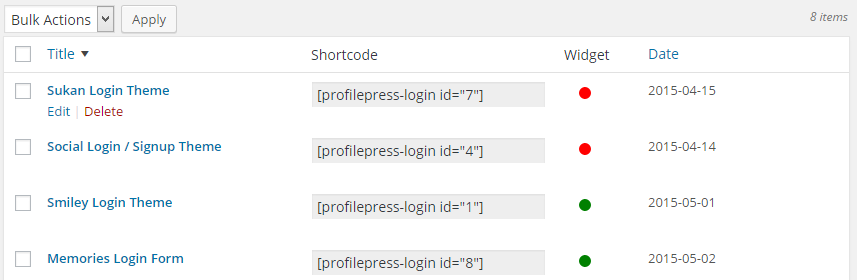
My acquaintance with
WP_List_Table stemmed from my experience building
the ProfilePress plugin. I actually used it to display the list of created user account forms in table form.
You’ve probably used plugins that use WP_List_Table, for example, the popular
Contact Form 7 plugin uses the class to display the list of created contact forms.
Getting Familiar with WP_List_Table
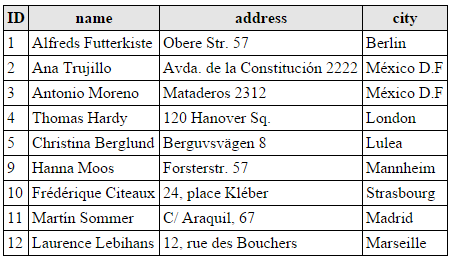
We’ll build a plugin to demonstrate how to display the dummy customer database below in a table format using WP_List_Table class.
The plugin is comprised of two classes: a child class of WP_List_Table and the plugin settings class.
Extending WP_List_Table
To build a WordPress UI table, the WP_List_Table will have to be extended with a couple of its methods overridden by a child class.
Firstly, we include the class in the plugin.
if ( ! class_exists( 'WP_List_Table' ) ) {
 require_once( ABSPATH . 'wp-admin/includes/class-wp-list-table.php' );
}
We then create a child class that extends WP_List_Table. The child class will be called Customers_List since we are dealing with a database of customers.
class Customers_List extends WP_List_Table {
public function __construct() {
parent::__construct( [
'singular' => __( 'Customer', 'sp' ),
'plural' => __( 'Customers', 'sp' ),
'ajax' => false
] );
}
Let’s create some helper methods that the child class will use.
The get_customers() method below query the customer database and return the data in array format.
public static function get_customers( $per_page = 5, $page_number = 1 ) {
global $wpdb;
$sql = "SELECT * FROM {$wpdb->prefix}customers";
if ( ! empty( $_REQUEST['orderby'] ) ) {
$sql .= ' ORDER BY ' . esc_sql( $_REQUEST['orderby'] );
$sql .= ! empty( $_REQUEST['order'] ) ? ' ' . esc_sql( $_REQUEST['order'] ) : ' ASC';
}
$sql .= " LIMIT $per_page";
$sql .= ' OFFSET ' . ( $page_number - 1 ) * $per_page;
$result = $wpdb->get_results( $sql, 'ARRAY_A' );
return $result;
}
If you’ve built a PHP/MySQL application that includes pagination, the OFFSET and LIMIT SQL syntax should be familiar to you.
The $per_page and $page_number arguments defines the SQL limit and the current page number.
The delete_customer() method takes care of deleting a given record from the database.
public static function delete_customer( $id ) {
global $wpdb;
$wpdb->delete(
"{$wpdb->prefix}customers",
[ 'ID' => $id ],
[ '%d' ]
);
}
The record_count() simply returns the number of customers in the database.
public static function record_count() {
global $wpdb;
$sql = "SELECT COUNT(*) FROM {$wpdb->prefix}customers";
return $wpdb->get_var( $sql );
}
We are done creating our helper methods, all succeeding methods are aimed at overriding their respective parent methods.
For example, WP_List_Table has a no_items() method that returns No items found when no data is found.
To include a custom message, we have to create the same method in our child class but with a different return message.
public function no_items() {
_e( 'No customers avaliable.', 'sp' );
}
The column_name method renders the name column of the table. A delete link is added below the customer name by passing an array containing the link key and value to row_action method.
function column_name( $item ) {
$delete_nonce = wp_create_nonce( 'sp_delete_customer' );
$title = '<strong>' . $item['name'] . '</strong>';
$actions = [
'delete' => sprintf( '<a href="?page=%s&action=%s&customer=%s&_wpnonce=%s">Delete</a>', esc_attr( $_REQUEST['page'] ), 'delete', absint( $item['ID'] ), $delete_nonce )
];
return $title . $this->row_actions( $actions );
}
Since the data output of the address and city column won’t be modified, the column_default method whose function is to render a column when no specific method exists for that column will handle their output.
public function column_default( $item, $column_name ) {
switch ( $column_name ) {
case 'address':
case 'city':
return $item[ $column_name ];
default:
return print_r( $item, true );
}
}
The column_cb method is used to render the checkbox responsible for carrying out bulk data operations.
function column_cb( $item ) {
return sprintf(
'<input type="checkbox" name="bulk-delete[]" value="%s" />', $item['ID']
);
}
The method get_columns() returns an array of columns that are going to be used in your table.
function get_columns() {
$columns = [
'cb' => '<input type="checkbox" />',
'name' => __( 'Name', 'sp' ),
'address' => __( 'Address', 'sp' ),
'city' => __( 'City', 'sp' )
];
return $columns;
}
The get_sortable_columns() method defines the columns to make sortable. Thus, WordPress will add a link to the title of the column which when clicked, changes the order of data presentation.
public function get_sortable_columns() {
$sortable_columns = array(
'name' => array( 'name', true ),
'city' => array( 'city', false )
);
return $sortable_columns;
}
get_bulk_actions() should return an associative array containing all the bulk actions available for the table.
public function get_bulk_actions() {
$actions = [
'bulk-delete' => 'Delete'
];
return $actions;
}
The prepare_items method is where the data query and filter, sort handling, pagination, and any other data-manipulation required prior to rendering is carried out.
Note: the method must include a call to the items parent class properties and the store the array of database data saved against it.
public function prepare_items() {
$this->_column_headers = $this->get_column_info();
$this->process_bulk_action();
$per_page = $this->get_items_per_page( 'customers_per_page', 5 );
$current_page = $this->get_pagenum();
$total_items = self::record_count();
$this->set_pagination_args( [
'total_items' => $total_items,
'per_page' => $per_page
] );
$this->items = self::get_customers( $per_page, $current_page );
}
Notice a call to process_bulk_action()? This method takes care of the deleting customers record either when the delete link is clicked or when a group of records is checked and the delete option is selected from the bulk action.
public function process_bulk_action() {
if ( 'delete' === $this->current_action() ) {
$nonce = esc_attr( $_REQUEST['_wpnonce'] );
if ( ! wp_verify_nonce( $nonce, 'sp_delete_customer' ) ) {
die( 'Go get a life script kiddies' );
}
else {
self::delete_customer( absint( $_GET['customer'] ) );
wp_redirect( esc_url( add_query_arg() ) );
exit;
}
}
if ( ( isset( $_POST['action'] ) && $_POST['action'] == 'bulk-delete' )
|| ( isset( $_POST['action2'] ) && $_POST['action2'] == 'bulk-delete' )
) {
$delete_ids = esc_sql( $_POST['bulk-delete'] );
foreach ( $delete_ids as $id ) {
self::delete_customer( $id );
}
wp_redirect( esc_url( add_query_arg() ) );
exit;
}
}
We are done extending the WP_List_Table class for our plugin, up next is building the plugin settings page that will display the data table of customers.
Building the Settings Page
We create the class for the settings page populated with the constructor method and properties.
class SP_Plugin {
static $instance;
public $customers_obj;
public function __construct() {
add_filter( 'set-screen-option', [ __CLASS__, 'set_screen' ], 10, 3 );
add_action( 'admin_menu', [ $this, 'plugin_menu' ] );
}
Below are the callback methods for set-screen-option filter and admin_menuaction hook.
public static function set_screen( $status, $option, $value ) {
 return $value;
}

public function plugin_menu() {

 $hook = add_menu_page(
  'Sitepoint WP_List_Table Example',
  'SP WP_List_Table',
  'manage_options',
  'wp_list_table_class',
  [ $this, 'plugin_settings_page' ]
 );

 add_action( "load-$hook", [ $this, 'screen_option' ] );

}
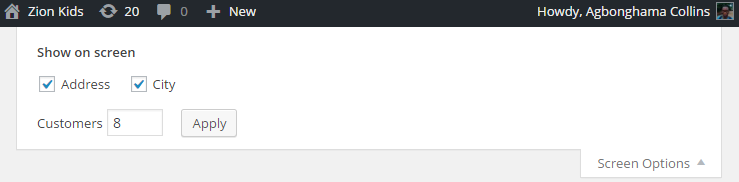
The plugin_menu() methods that creates the settings page includes a callback screen_option() method to create the screen option for setting the default number of data to display in the table.
public function screen_option() {
$option = 'per_page';
$args = [
'label' => 'Customers',
'default' => 5,
'option' => 'customers_per_page'
];
add_screen_option( $option, $args );
$this->customers_obj = new Customers_List();
}
Take note: we instantiated the Customers_List child class and saved the object to the customers_obj property defined earlier at the class declaration.
Below is the plugin_settings_page callback method that displays the content of the settings page.
public function plugin_settings_page() {
?>
<div class="wrap">
<h2>WP_List_Table Class Example</h2>
<div id="poststuff">
<div id="post-body" class="metabox-holder columns-2">
<div id="post-body-content">
<div class="meta-box-sortables ui-sortable">
<form method="post">
<?php
$this->customers_obj->prepare_items();
$this->customers_obj->display(); ?>
</form>
</div>
</div>
</div>
<br class="clear">
</div>
</div>
<?php
}
From the code above, the customer table is displayed by first calling prepare_items() to prepare the data and then display() to display the table content.
To ensure only one object instance exists, here’s the singleton method.
public static function get_instance() {
if ( ! isset( self::$instance ) ) {
self::$instance = new self();
}
return self::$instance;
}
Finally, we call the singleton method when all plugins have been loaded by WordPress.
add_action( 'plugins_loaded', function () {
 SP_Plugin::get_instance();
} );
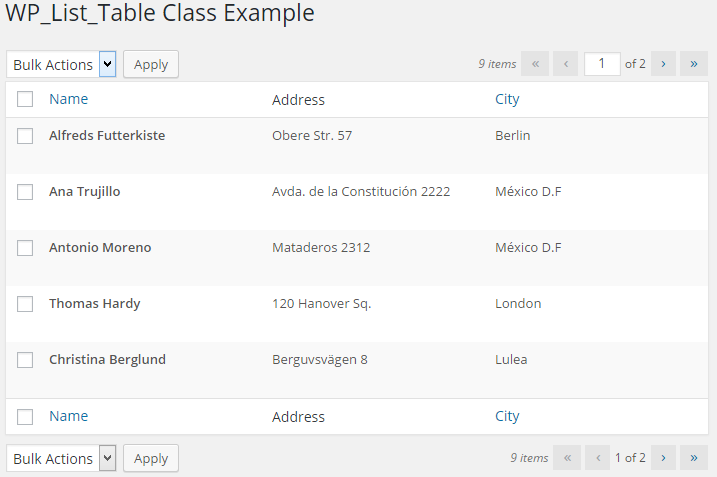
When the plugin is installed and activated, you’ll see the customer data display in the WordPress table UI as depicted in the image below.
Summary
In this tutorial, we’ve covered how to display custom data retrieved from the database in tabular format using the powerful WP_List_Table PHP Class.
The plugin source code is available on
GitHub. Download, install it in your WordPress powered site and explore the code.
If you have any questions or contributions, let us know in the comments.