Sunday, August 6, 2023

How to Batch Import Huge CSV Fast using PHP (Million Records in Seconds)

I know, I know! How can you put PHP and Fast in the same line? I would say, you are stuck in the past. You should try PHP 7 and experience it yourself. There will be a lot of criticism for this article. Kindly read through.

LOAD DATA INFILE is the best option to import a huge CSV file. In this article we are going to see how we are going to read a CSV file and INSERT records via PHP script. This can be used in such a special case.

In general PHP will not have such use cases. But you never know, when you will come across such a situation, a client requirement can come any time. When you are a “freelance programmer” (not playing a consultant role), you will be thrust upon with all sorts of crazy requirements.

Huge CSV Import PHP

I have written an article about all things CSV in PHP. You should go through that to learn about handling CSV files in PHP.

I am well aware about the micro-benchmarking and its pitfalls. So, I didn’t go in that direction for this articles. That’s why I have given in the title as just seconds. It’s an approximation. This is not for people who are going to see in micro, nano seconds.

If you want to insert a million records in few seconds, using PHP script programmatically, then this will definitely help. The use case is rare and so the solution. You may have to do some tweaks here and there in this sample code to fit for your case.

<?php

function file_get_contents_chunked($link, $file, $chunk_size, $queryValuePrefix, $callback)
{
    try {
        $handle = fopen($file, "r");
        $i = 0;
        while (! feof($handle)) {
            call_user_func_array($callback, array(
                fread($handle, $chunk_size),
                &$handle,
                $i,
                &$queryValuePrefix,
                $link
            ));
            $i ++;
        }
        fclose($handle);
    } catch (Exception $e) {
        trigger_error("file_get_contents_chunked::" . $e->getMessage(), E_USER_NOTICE);
        return false;
    }

    return true;
}
$link = mysqli_connect("localhost", "root", "pass", "huge-csv");
$success = file_get_contents_chunked($link, "sample-dataset.csv", 2048, '', function ($chunk, &$handle, $iteration, &$queryValuePrefix, $link) {
    $TABLENAME = 'tbl_lead';
    $chunk = $queryValuePrefix . $chunk;

    // split the chunk of string by newline. Not using PHP's EOF
    // as it may not work for content stored on external sources
    $lineArray = preg_split("/\r\n|\n|\r/", $chunk);
    $query = 'INSERT INTO ' . $TABLENAME . '(id, name, email) VALUES ';
    $numberOfRecords = count($lineArray);
    for ($i = 0; $i < $numberOfRecords - 2; $i ++) {
        // split single CSV row to columns
        $colArray = explode(',', $lineArray[$i]);
        $query = $query . '(' . $colArray[0] . ',"' . $colArray[1] . '","' . $colArray[2] . '"),';
    }
    // last row without a comma
    $colArray = explode(',', $lineArray[$i]);
    $query = $query . '(' . $colArray[0] . ',"' . $colArray[1] . '","' . $colArray[2] . '")';
    $i = $i + 1;

    // storing the last truncated record and this will become the
    // prefix in the next run
    $queryValuePrefix = $lineArray[$i];
    mysqli_query($link, $query) or die(mysqli_error($link));

    /*
     * {$handle} is passed in case you want to seek to different parts of the file
     * {$iteration} is the section of the file that has been read so
     * ($i * 4096) is your current offset within the file.
     */
});

if (! $success) {
    // It Failed
}

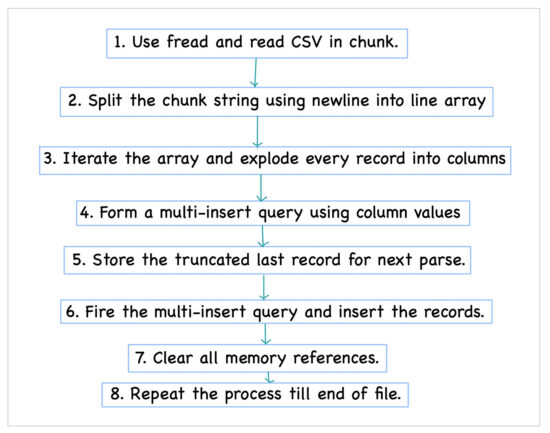
Two main things to note are,

  1. Read the file in chunks (batch).
  2. Insert multiple records in a single insert statement.

The above is key in speeding up the overall process. Reading line by line and iterating through a loop will slowdown the process. So everything boils down to reading chunks (batches) and multi insert. Then a third point worth mentioning is use PHP native functions wherever possible.

I have used a Regex to replace newline in the CSV file. If you got a better option please suggest via comments section below.

Now let me walkthrough the code. 

PHP’s fread allows to read in chunks of strings. Try experimenting with different chunk (batch) sizes. There is no particular right size. There are lots of variables, your server configuration, hardware, MySQL setup and lot more.

I have used a sample CSV file which I generated myself. I will detail the process below. You can use your own sample or real data and pass that as a parameter.

file_get_contents_chunked does the processing of CSV file and this has a callback function as the last argument. This callback takes care of parsing the record by the delimiter (comma in my example) and creating the multi-insert query and doing the actual insert.

You may have to modify the query part to suit your database table format. The overall structure of the script takes care of parsing the CSV in chunks (batches) and callbacks. Thanks to RobertPitt

One thing worth mentioning is, instead of reading line by line I have used the chunk as it is to improve the speed. All through the Internet users have suggested fgetcsv. But I have gone ahead with chunk (batch) read of fread. 

The fread when reading as chunk (batch) it will obviously have part a part of a CSV row truncated. I have stored that truncated last record in each chunk in $queryValuePrefix variable. It is retained by declaring as a reference via callback. 

Sample CSV dataset

I wrote a tiny PHP script to generate the required CSV dataset. There are a lot of sources like Government census record, now popular Covid data, weather data and lot more.

At this time of Artificial Intelligence era, where Data Mining is more popular than Twinkle Twinkle Little Star, getting a sample huge CSV file is just a click away.

But still for flexibility, I wrote the PHP script myself. 

<?php
$file = fopen('s-sample-dataset.csv', 'w');

for ($i = 1; $i <= 1000000; $i ++) {
    echo $i;
    $line[] = $i;
    $line[] = uniqid();
    $line[] = uniqid();
    fputcsv($file, $line);
    $line = null;
}
fclose($file);

This is a ruthless way of generating a sample data :-) At this juncture Faker is  worth mentioning. It is a good PHP library for generating nice fake data. It will look very close to real.

Last, for the nerds. This script ran and imported one million (1000000) records in 9 seconds. My machine is a MacBookPro with Catalina, 2.3 GHz i5, 16 GB RAM and PHP 7.4. This is just for an idea and please do not make much out of this.

Pour in all your view points and suggestions for improvement in the below comments. Happy parsing all your CSVs, chunk it out!

Comments to “How to Batch Import Huge CSV Fast using PHP (Million Records in Seconds)”


This article is taken from below website.

Credit goes to: Nikunj Jadav

SOURCE: https://phppot.com/php/how-to-batch-import-huge-csv-fast-using-php-million-records-in-seconds/

Monday, December 19, 2022

Get a list of (date) quarters between two given dates. Return array of objects with information about each quarter

<?php 

// get month name from number
function month_name($month_number){
	return date('F', mktime(0, 0, 0, $month_number, 10));
}


// get get last date of given month (of year)
function month_end_date($year, $month_number){
	return date("t", strtotime("$year-$month_number-1"));
}

// return two digit month or day, e.g. 04 - April
function zero_pad($number){
	if($number < 10)
		return "0$number";
	
	return "$number";
}

// Return quarters between tow dates. Array of objects
function get_quarters($start_date, $end_date){
	
	$quarters = array();
	
	$start_month = date( 'm', strtotime($start_date) );
	$start_year = date( 'Y', strtotime($start_date) );
	
	$end_month = date( 'm', strtotime($end_date) );
	$end_year = date( 'Y', strtotime($end_date) );
	
	$start_quarter = ceil($start_month/3);
	$end_quarter = ceil($end_month/3);

	$quarter = $start_quarter; // variable to track current quarter
	
	// Loop over years and quarters to create array
	for( $y = $start_year; $y <= $end_year; $y++ ){
		if($y == $end_year)
			$max_qtr = $end_quarter;
		else
			$max_qtr = 4;
		
		for($q=$quarter; $q<=$max_qtr; $q++){
			
			$current_quarter = new stdClass();
			
			$end_month_num = zero_pad($q * 3);
			$start_month_num = ($end_month_num - 2);

			$q_start_month = month_name($start_month_num);
			$q_end_month = month_name($end_month_num);
			
			$current_quarter->period = "Qtr $q ($q_start_month - $q_end_month) $y";
			$current_quarter->period_start = "$y-$start_month_num-01";      // yyyy-mm-dd    
			$current_quarter->period_end = "$y-$end_month_num-" . month_end_date($y, $end_month_num);
			
			$quarters[] = $current_quarter;
			unset($current_quarter);
		}

		$quarter = 1; // reset to 1 for next year
	}
	
	return $quarters;
	
}

$quarters = get_quarters('2010-04-05', '2015-05-01');
       

// Test	   
echo '<pre>';
print_r($quarters);
echo '</pre>';

Source: https://gist.github.com/steveirl/63c65561b6000de5c346


Tuesday, November 15, 2022

How to update product price programmatically in WooCommerce

How to update product price programmatically in WooCommerce


Do you want to learn how to update the product price programmatically in WooCommerce? In this guide, we’ll show you how to change prices in WooCommerce without using any plugins or installing any extra tool.

If you use them smartly, discounts can help you improve your conversion rates and increase your sales. There are several ways to implement discounts on your e-commerce store. For example, you can apply WooCommerce coupons programmatically.

However, you can also update the product price without using coupons. For example, you could give an exclusive discount to users that are subscribed to your newsletter or who have spent more than $100 in your store.

In this guide, you’ll learn to change the price when customers add a product to the cart without using any coupons and by accessing the WooCommerce cart object directly. We’ll have a look at some examples and apply some logic when updating the price. The goal is that you understand the logic so you can customize the scripts and apply them to your store.

How to update the product price programmatically in WooCommerce

In this section, you’ll learn how to update the product price programmatically in WooCommerce. We’ll have a look at different examples to give you some ideas of what you can do in your store.

  1. Update product price when a checkbox is selected
    1. Add the checkbox input field to the products page
    2. Update the price when a user adds a product to the cart
    3. Recalculate the total price of the cart
  2. Edit the product price based on user roles
  3. Update the product price based on product taxonomy

Keep in mind that we’ll use several WooCommerce hooks so it’s a good idea to check out this guide if you’re not familiar with them.

Before we start…

Before we start, as we’ll make modifications to some core files, we recommend you install a child theme on your site. If you don’t have a child theme and you don’t know how to install it, check out our guide to create a child theme or our list of the best child theme plugins.

NOTE: To apply these scripts, copy and paste them in the functions.php file of the child theme. However, keep in mind that they’re intended for didactic purposes only so customize them before taking them to production.

1) Update product price when a checkbox is selected

In the following sample script, we’ll add a checkbox input in the cart form on the product page. This way, we can apply custom logic and dynamically update the price of any product that customers add to the cart only when the checkbox is selected.How to update product price programmatically in WooCommerce

1.1 Add the checkbox input field to the products page

Before we update the WooCommerce product price programmatically, let’s add the checkbox to the products page. To do that, simply copy and paste the following script:

add_action('woocommerce_after_add_to_cart_button', 'add_check_box_to_product_page', 30 );
function add_check_box_to_product_page(){ ?>     
       <div style="margin-top:20px">           
<label for="extra_pack"> <?php _e( 'Extra packaging', 'quadlayers' ); ?>
<input type="checkbox" name="extra_pack" value="extra_pack"> 
</label>
                    
</div>
     <?php
}

The woocommerce_after_add_to_cart_button hook allows us to print the checkbox right after the button as shown in the image above.

1.2 Update the price when the user adds a product to the cart

Another interesting option is to update the price dynamically when customers add a product to their carts. So, in this case, to update the price programmatically in WooCommerce simply paste this script right after the previous one.

add_filter( 'woocommerce_add_cart_item_data', 'add_cart_item_data', 10, 3 );
 
function add_cart_item_data( $cart_item_data, $product_id, $variation_id ) {
     // get product id & price
    $product = wc_get_product( $product_id );
    $price = $product->get_price();
    // extra pack checkbox
    if( ! empty( $_POST['extra_pack'] ) ) {
       
        $cart_item_data['new_price'] = $price + 15;
    }
return $cart_item_data;
}

woocommerce_add_cart_item_data is the WooCommerce hook that will allow us to edit the price of the current product. Additionally, the if() conditional checks whether the checkbox is selected or not, and if it is, updates the price in the following line. Now, let’s break down the code to better understand what each part does.

  • extra_pack is the name of the checkbox we’ve created in the previous step
  • $price is the current product price. We can modify it as we want with some conditions
  • $cart_item_data['new_price'] = $price + 15; is how we increase the price by $15 when the if() conditional is true, this is when the user selects the extra packaging checkbox. By adjusting the code, you can choose to increase or decrease the price by any amount you want.

1.3 Recalculate the total price of the cart

Since we can call the woocommerce_add_cart_item_data hook several times when loading the cart, we need to recalculate the totals and subtotals of the cart to avoid undesired results such as prices being updated multiple times or every time a user adds a product. To update the product, paste the following code after the previous two ones:

add_action( 'woocommerce_before_calculate_totals', 'before_calculate_totals', 10, 1 );
 
function before_calculate_totals( $cart_obj ) {
if ( is_admin() && ! defined( 'DOING_AJAX' ) ) {
return;
}
// Iterate through each cart item
foreach( $cart_obj->get_cart() as $key=>$value ) {
if( isset( $value['new_price'] ) ) {
$price = $value['new_price'];
$value['data']->set_price( ( $price ) );
}
}
}

This function ensures that we only update the price when a product matches our conditional logic (that the user selects the extra packaging checkbox). This way, we prevent all possible errors when calculating the total price of the cart. Update product price programmatically in WooCommerce - Extra fee

Product price increases by $15

If everything went fine and the cart meets the conditions we set, our function will add an extra $15 charge to the original price when the user selects the checkbox on the product page, before clicking the Add to cart button.

To avoid cart abandonment and improve the buying experience, you should always display the new price before the customers add the products to their carts. Otherwise, they’ll only see the final price on the checkout page.

2. Edit the product price based on user roles

Similarly, we can update the WooCommerce product price programmatically based on user roles. For example, you could give subscribed or registered users an exclusive discount. To do that, copy and paste the following script:

function add_cart_item_data( $cart_item_data, $product_id, $variation_id ) {
    // get product id & price
   $product = wc_get_product( $product_id );
   $price = $product->get_price();
   if(// Is logged in && is customer role
       is_user_logged_in()==true&& wc_current_user_has_role( 'customer' )){
       
        $cart_item_data['new_price'] = $price * 0.8;
   }
return $cart_item_data;
}
add_filter( 'woocommerce_add_cart_item_data', 'add_cart_item_data', 10, 3 );

As you can see, the only difference between this script and the previous one in point 1.2 is the if() logic operator. Here, we are checking whether the user is logged in or not and if it has a customer role, which we assign to registered users who have purchased from our store before.

When a shopper meets that condition, we multiply the product price by 0.8, giving them a 20% discount. Of course, you can edit the user roles and change them for others such as Subscriber, Editor, or any other roles that you have registered on your website.

Note that to work properly, you also need to use the 'before_calculate_totals' function and its hook to recalculate the cart totals. So simply use recalculate the total price of the cart script we saw in step 1.3.

3. Update product price based on product taxonomy

Finally, in WooCommerce we can also dynamically update the product price programmatically based on product taxonomies. To do that, let’s have a look at the following script.

add_filter( 'woocommerce_add_cart_item_data', 'add_cart_item_data', 10, 3 );
 
function add_cart_item_data( $cart_item_data, $product_id, $variation_id ) {
     // get product id & price
    $product = wc_get_product( $product_id );
    $price = $product->get_price();
    $terms = get_the_terms( $product_id, 'product_cat' );
    // Category match ! apply discount
    if($terms[0]->name=='Posters'){                    
        $cart_item_data['new_price'] = $price + 20;
     }   
return $cart_item_data;
 
}

In this example, we are getting the category of the product that has been added to the cart using the get_the_terms() WordPress inbuilt function. In the next line, we apply our conditional to retrieve the category of the product using $terms[0]->name. This way, if the product belongs to the category Posters, we increase the price by $20.

This is a sample script that you can take as a base and edit it to change both the taxonomy and the amount you want to add or deduct from the price.

Finally, remember that you need to use the 'before_calculate_totals' function and its corresponding hook as we did in step 1.3.


As you can see, the know-how of using conditional and WordPress/WooCommerce functions will provide an extremely flexible way to update product prices programmatically. These are just a few examples to give you ideas of what’s possible.

However, there’s a lot more you can do so unleash your creativity and find new ways to edit the price of your products. For example, you can apply discounts on specific product IDs, based on the URL the users came from, depending on the users’ location or ID, and so on. The possibilities are endless so play around with the script and find the best solutions for your store.

FINAL NOTES

  • These sample scripts in points 1, 2, and 3 will not work together. You will need to refine your logic into a single one if you want to apply multiple functions at the same time
  • You may need to include additional validation functions for more complex conditional logic
  • Always apply a recalculation function – as seen in point 1.3 – when working with the WooCommerce cart object
  • These are sample scripts and are intended for didactic purposes only. Please adjust them before taking them into production

Source: https://quadlayers.com/update-product-price-programmatically-in-woocommerce/
Credit : SEBASTOPOLYS

Wednesday, October 26, 2022

Add image file upload field to WooCommerce single products

You could try the following, that will store uploaded image data as custom cart item data and save it as custom order item meta data: 

// Display additional product fields (+ jQuery code)

add_action( 'woocommerce_before_add_to_cart_button', 'display_additional_product_fields', 9 );
function display_additional_product_fields(){
    ?>
    <p class="form-row validate-required" id="image" >
        <label for="file_field"><?php echo __("Upload Image") . ': '; ?>
            <input type='file' name='image' accept='image/*'>
        </label>
    </p>
    <?php
}


// Add custom fields data as the cart item custom data
add_filter( 'woocommerce_add_cart_item_data', 'add_custom_fields_data_as_custom_cart_item_data', 10, 2 );
function add_custom_fields_data_as_custom_cart_item_data( $cart_item, $product_id ){
    if( isset($_FILES['image']) && ! empty($_FILES['image']) ) {
        $upload       = wp_upload_bits( $_FILES['image']['name'], null, file_get_contents( $_FILES['image']['tmp_name'] ) );
        $filetype     = wp_check_filetype( basename( $upload['file'] ), null );
        $upload_dir   = wp_upload_dir();
        $upl_base_url = is_ssl() ? str_replace('http://', 'https://', $upload_dir['baseurl']) : $upload_dir['baseurl'];
        $base_name    = basename( $upload['file'] );

        $cart_item['file_upload'] = array(
            'guid'      => $upl_base_url .'/'. _wp_relative_upload_path( $upload['file'] ), // Url
            'file_type' => $filetype['type'], // File type
            'file_name' => $base_name, // File name
            'title'     => ucfirst( preg_replace('/\.[^.]+$/', '', $base_name ) ), // Title
        );
        $cart_item['unique_key'] = md5( microtime().rand() ); // Avoid merging items
    }
    return $cart_item;
}

// Display custom cart item data in cart (optional)
add_filter( 'woocommerce_get_item_data', 'display_custom_item_data', 10, 2 );
function display_custom_item_data( $cart_item_data, $cart_item ) {
    if ( isset( $cart_item['file_upload']['title'] ) ){
        $cart_item_data[] = array(
            'name' => __( 'Image uploaded', 'woocommerce' ),
            'value' =>  str_pad($cart_item['file_upload']['title'], 16, 'X', STR_PAD_LEFT) . '…',
        );
    }
    return $cart_item_data;
}

// Save Image data as order item meta data
add_action( 'woocommerce_checkout_create_order_line_item', 'custom_field_update_order_item_meta', 20, 4 );
function custom_field_update_order_item_meta( $item, $cart_item_key, $values, $order ) {
    if ( isset( $values['file_upload'] ) ){
        $item->update_meta_data( '_img_file',  $values['file_upload'] );
    }
}

// Admin orders: Display a linked button + the link of the image file
add_action( 'woocommerce_after_order_itemmeta', 'backend_image_link_after_order_itemmeta', 10, 3 );
function backend_image_link_after_order_itemmeta( $item_id, $item, $product ) {
    // Only in backend for order line items (avoiding errors)
    if( is_admin() && $item->is_type('line_item') && $file_data = $item->get_meta( '_img_file' ) ){
        echo '<p><a href="'.$file_data['guid'].'" target="_blank" class="button">'.__("Open Image") . '</a></p>'; // Optional
        echo '<p><code>'.$file_data['guid'].'</code></p>'; // Optional
    }
}

// Admin new order email: Display a linked button + the link of the image file
add_action( 'woocommerce_email_after_order_table', 'wc_email_new_order_custom_meta_data', 10, 4);
function wc_email_new_order_custom_meta_data( $order, $sent_to_admin, $plain_text, $email ){
    // On "new order" email notifications
    if ( 'new_order' === $email->id ) {
        foreach ($order->get_items() as $item ) {
            if ( $file_data = $item->get_meta( '_img_file' ) ) {
                echo '<p>
                    <a href="'.$file_data['guid'].'" target="_blank" class="button">'.__("Download Image") . '</a><br>
                    <pre><code style="font-size:12px; background-color:#eee; padding:5px;">'.$file_data['guid'].'</code></pre>
                </p><br>';
            }
        }
    }
}

Source: https://stackoverflow.com/questions/62847710/add-image-file-upload-field-to-woocommerce-single-products 

How to change the PHP version for subfolders or subdomains

  How to change the PHP version for subfolders or subdomains Setting a specific PHP version for a specific websites, subfolders or subdomain...