Do you want to learn how to update the product price programmatically in WooCommerce? In this guide, we’ll show you how to change prices in WooCommerce without using any plugins or installing any extra tool.
If you use them smartly, discounts can help you improve your conversion rates and increase your sales. There are several ways to implement discounts on your e-commerce store. For example, you can apply WooCommerce coupons programmatically.
However, you can also update the product price without using coupons. For example, you could give an exclusive discount to users that are subscribed to your newsletter or who have spent more than $100 in your store.
In this guide, you’ll learn to change the price when customers add a product to the cart without using any coupons and by accessing the WooCommerce cart object directly. We’ll have a look at some examples and apply some logic when updating the price. The goal is that you understand the logic so you can customize the scripts and apply them to your store.
How to update the product price programmatically in WooCommerce
In this section, you’ll learn how to update the product price programmatically in WooCommerce. We’ll have a look at different examples to give you some ideas of what you can do in your store.
- Update product price when a checkbox is selected
- Add the checkbox input field to the products page
- Update the price when a user adds a product to the cart
- Recalculate the total price of the cart
- Edit the product price based on user roles
- Update the product price based on product taxonomy
Keep in mind that we’ll use several WooCommerce hooks so it’s a good idea to check out this guide if you’re not familiar with them.
Before we start…
Before we start, as we’ll make modifications to some core files, we recommend you install a child theme on your site. If you don’t have a child theme and you don’t know how to install it, check out our guide to create a child theme or our list of the best child theme plugins.
NOTE: To apply these scripts, copy and paste them in the functions.php file of the child theme. However, keep in mind that they’re intended for didactic purposes only so customize them before taking them to production.
1) Update product price when a checkbox is selected
In the following sample script, we’ll add a checkbox input in the cart form on the product page. This way, we can apply custom logic and dynamically update the price of any product that customers add to the cart only when the checkbox is selected.
1.1 Add the checkbox input field to the products page
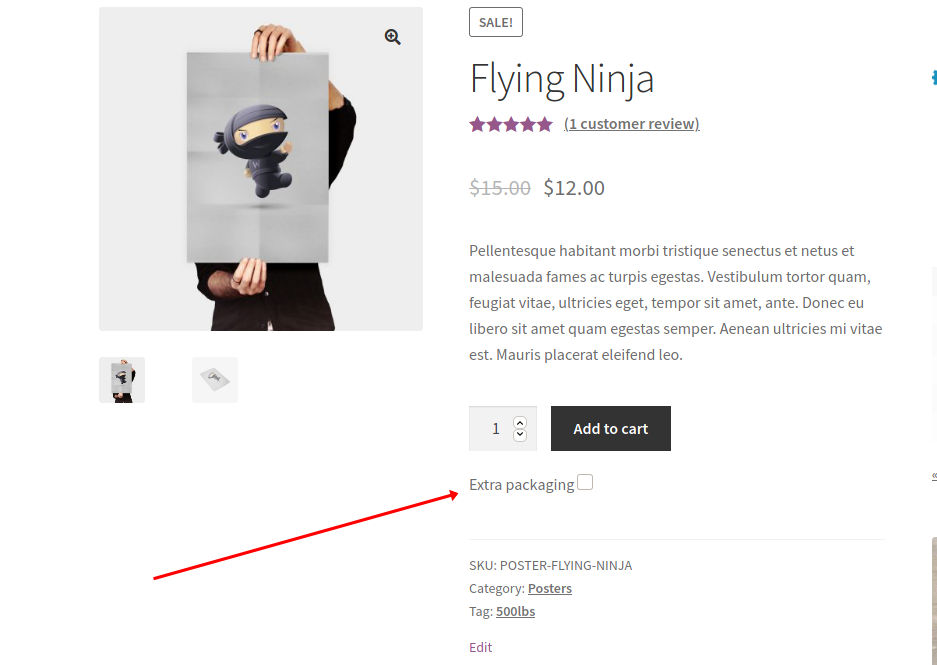
Before we update the WooCommerce product price programmatically, let’s add the checkbox to the products page. To do that, simply copy and paste the following script:
add_action('woocommerce_after_add_to_cart_button', 'add_check_box_to_product_page', 30 );
function add_check_box_to_product_page(){ ?>
       <div style="margin-top:20px">
<label for="extra_pack"> <?php _e( 'Extra packaging', 'quadlayers' ); ?>
<input type="checkbox" name="extra_pack" value="extra_pack">
</label>

</div>
     <?php
}
The woocommerce_after_add_to_cart_button hook allows us to print the checkbox right after the button as shown in the image above.
1.2 Update the price when the user adds a product to the cart
Another interesting option is to update the price dynamically when customers add a product to their carts. So, in this case, to update the price programmatically in WooCommerce simply paste this script right after the previous one.
add_filter( 'woocommerce_add_cart_item_data', 'add_cart_item_data', 10, 3 );

function add_cart_item_data( $cart_item_data, $product_id, $variation_id ) {
     // get product id & price
    $product = wc_get_product( $product_id );
    $price = $product->get_price();
    // extra pack checkbox
    if( ! empty( $_POST['extra_pack'] ) ) {

        $cart_item_data['new_price'] = $price + 15;
    }
return $cart_item_data;
}
woocommerce_add_cart_item_data is the WooCommerce hook that will allow us to edit the price of the current product. Additionally, the if() conditional checks whether the checkbox is selected or not, and if it is, updates the price in the following line. Now, let’s break down the code to better understand what each part does.
extra_pack is the name of the checkbox we’ve created in the previous step$price is the current product price. We can modify it as we want with some conditions$cart_item_data['new_price'] = $price + 15; is how we increase the price by $15 when the if() conditional is true, this is when the user selects the extra packaging checkbox. By adjusting the code, you can choose to increase or decrease the price by any amount you want.
1.3 Recalculate the total price of the cart
Since we can call the woocommerce_add_cart_item_data hook several times when loading the cart, we need to recalculate the totals and subtotals of the cart to avoid undesired results such as prices being updated multiple times or every time a user adds a product. To update the product, paste the following code after the previous two ones:
add_action( 'woocommerce_before_calculate_totals', 'before_calculate_totals', 10, 1 );

function before_calculate_totals( $cart_obj ) {
if ( is_admin() && ! defined( 'DOING_AJAX' ) ) {
return;
}
// Iterate through each cart item
foreach( $cart_obj->get_cart() as $key=>$value ) {
if( isset( $value['new_price'] ) ) {
$price = $value['new_price'];
$value['data']->set_price( ( $price ) );
}
}
}
This function ensures that we only update the price when a product matches our conditional logic (that the user selects the extra packaging checkbox). This way, we prevent all possible errors when calculating the total price of the cart. 
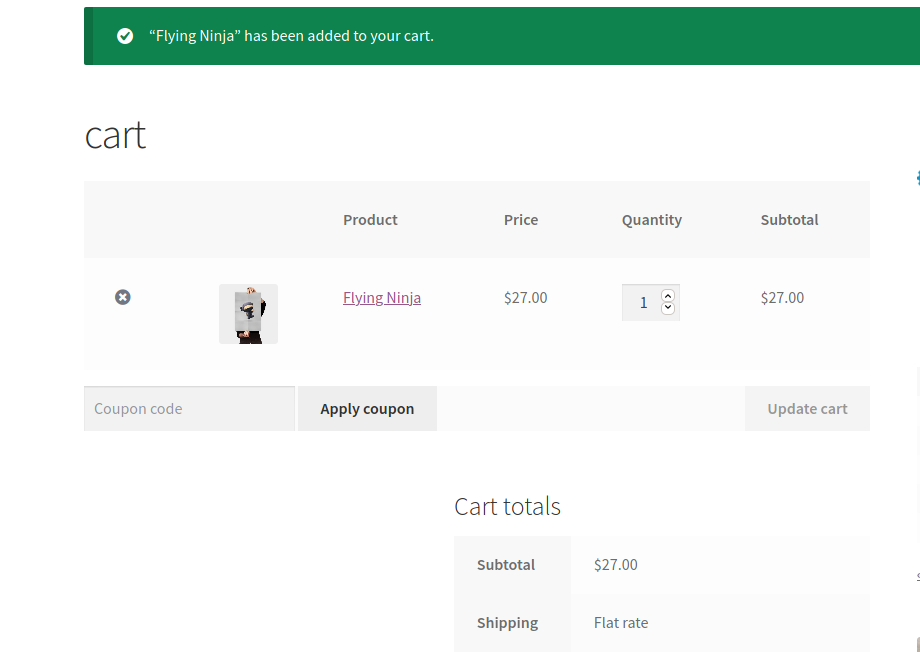
Product price increases by $15
If everything went fine and the cart meets the conditions we set, our function will add an extra $15 charge to the original price when the user selects the checkbox on the product page, before clicking the Add to cart button.
To avoid cart abandonment and improve the buying experience, you should always display the new price before the customers add the products to their carts. Otherwise, they’ll only see the final price on the checkout page.
2. Edit the product price based on user roles
Similarly, we can update the WooCommerce product price programmatically based on user roles. For example, you could give subscribed or registered users an exclusive discount. To do that, copy and paste the following script:
function add_cart_item_data( $cart_item_data, $product_id, $variation_id ) {
    // get product id & price
   $product = wc_get_product( $product_id );
   $price = $product->get_price();
   if(// Is logged in && is customer role
       is_user_logged_in()==true&& wc_current_user_has_role( 'customer' )){

        $cart_item_data['new_price'] = $price * 0.8;
   }
return $cart_item_data;
}
add_filter( 'woocommerce_add_cart_item_data', 'add_cart_item_data', 10, 3 );
As you can see, the only difference between this script and the previous one in point 1.2 is the if() logic operator. Here, we are checking whether the user is logged in or not and if it has a customer role, which we assign to registered users who have purchased from our store before.
When a shopper meets that condition, we multiply the product price by 0.8, giving them a 20% discount. Of course, you can edit the user roles and change them for others such as Subscriber, Editor, or any other roles that you have registered on your website.
Note that to work properly, you also need to use the 'before_calculate_totals' function and its hook to recalculate the cart totals. So simply use recalculate the total price of the cart script we saw in step 1.3.
3. Update product price based on product taxonomy
Finally, in WooCommerce we can also dynamically update the product price programmatically based on product taxonomies. To do that, let’s have a look at the following script.
add_filter( 'woocommerce_add_cart_item_data', 'add_cart_item_data', 10, 3 );

function add_cart_item_data( $cart_item_data, $product_id, $variation_id ) {
     // get product id & price
    $product = wc_get_product( $product_id );
    $price = $product->get_price();
    $terms = get_the_terms( $product_id, 'product_cat' );
    // Category match ! apply discount
    if($terms[0]->name=='Posters'){
        $cart_item_data['new_price'] = $price + 20;
     }
return $cart_item_data;

}
In this example, we are getting the category of the product that has been added to the cart using the get_the_terms() WordPress inbuilt function. In the next line, we apply our conditional to retrieve the category of the product using $terms[0]->name. This way, if the product belongs to the category Posters, we increase the price by $20.
This is a sample script that you can take as a base and edit it to change both the taxonomy and the amount you want to add or deduct from the price.
Finally, remember that you need to use the 'before_calculate_totals' function and its corresponding hook as we did in step 1.3.
As you can see, the know-how of using conditional and WordPress/WooCommerce functions will provide an extremely flexible way to update product prices programmatically. These are just a few examples to give you ideas of what’s possible.
However, there’s a lot more you can do so unleash your creativity and find new ways to edit the price of your products. For example, you can apply discounts on specific product IDs, based on the URL the users came from, depending on the users’ location or ID, and so on. The possibilities are endless so play around with the script and find the best solutions for your store.
FINAL NOTES
- These sample scripts in points 1, 2, and 3 will not work together. You will need to refine your logic into a single one if you want to apply multiple functions at the same time
- You may need to include additional validation functions for more complex conditional logic
- Always apply a recalculation function – as seen in point 1.3 – when working with the WooCommerce cart object
- These are sample scripts and are intended for didactic purposes only. Please adjust them before taking them into production


